Mame Master Blaster
2025-01-05 08:45:00
This is part 4 of a series based on thread design patterns. In this post we will look at the Boss Worker pattern again and how to use it in hardware design. The Birrell paper in Part 1 covers this pattern under the Detach section. I will be covering a Mame emulator of Dr. Scott M. Baker's Master Blaster (8008-Super). He goes into detailed design on the hardware, and use of the pattern, in this project write-up.
Why Master Blaster
I love homebrew computers. Something about starting with a few ICs and getting a computer up and running is interesting to me. Dr. Baker's 8008-Super is the Boss Worker pattern in hardware with a Mad Max twist. It felt like something I could emulate in a reasonable amount of time. Also, I had never written Mame drivers before this project and it sounded like something fun to learn.
Why Mame
I have written simulators before for the 6502 and for the 8088/8086. For both of those simulators, I had to write a lot of code from scratch and I cut some corners when it came to clock speeds and cycle accuracy. Mame's codebase is a different story. It is more like building an emulator on a breadboard. It provides a number of ICs out of the box and you mix and match.
8008-SBC Jim Loos
This is the first Mame driver that I have written so I wanted to start with one that was simpler than the 8008-Super. The 8008-Super is based off of a single board computer (sbc) written by Jim Loos called the 8008-SBC.
After getting familiar with where things are in the Mame repo, and reading a few other SBC drivers, I was able to get a driver working.
Driver File
The Mame source code is a gold mine when it comes to old hardware. I could spend all day reading the code and comments for these machines. For our purpose though, we want to look in the homebrew section. They have a few different versions of Grant Searle's SBCs and I used these as a reference.
The driver ended up being around 262 lines with comments and is hopefully easy to understand. It does have a couple of tricky bits. The first one is timing.
Tricky parts
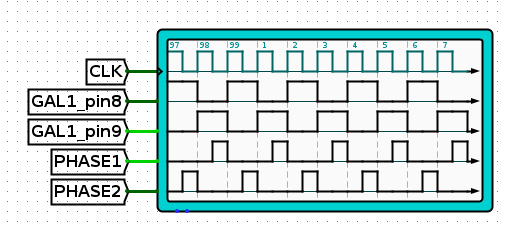
Since the 8008-SBC is using bitbanged I/O for serial communications, the timing has to be just right for the 2400 baud rate to work. The code that initializes the clock takes a 1 Mhz crystal and divides it down by 4.
I8008(config, m_maincpu, XTAL(1'000'000)/4);
I needed to simulate the clock in Logisim Evolution to be able to really understand what was going on.

Another gotcha is on startup as stated in this comment from the PLD:
simulated SR flip-flop made up of cross-connected NAND gates. the flip-flop is set when the reset signal from the DS1233 goes low (power-on-reset) and cleared when input port 1 is accessed. when set, the flip-flop forces all memory accesses to select the EPROM. when reset, the flip-flop permits the normal memory map.
This is handled using a boolean start variable that is set to false when a read from port 1 happens:
uint8_t sbc8008_state::port_1_read(){
    start = false;
    return (uint8_t)start;
}
This variable is used during memory reads to determine if ram or rom is being accessed:
uint8_t sbc8008_state::memory_read(offs_t offset){
    if (start){
        return ((uint8_t*)m_rom_bank->base())[offset];
    } else if (offset < m_ram->size()){
        return m_ram->pointer()[offset];
    } else {
        logerror("%s:ld invalid mode read ($%02X) start %d size %d\n", machine().describe_context(), offset, start, m_ram->size());
        return 0xff;
    }
}
Layout File
The 8008-SBC has Blinkenlights and I wanted those to be available in the emulator. Mame allows this by providing a markup language that defines what is on the screen. These markups can be found in the layout directory. The layout file for the 8008-SBC is sbc8008.lay
The leds are then available in the driver by using output_finder<8> m_leds; and m_run_led.resolve();. It uses the naming pattern used in the constructor as the key into the layout structure. That means m_leds(*this, "led%u", 0U) will bind to led0 through led7.
Overview
The first thing we needed to do is define a class for the machine. This one is about a straight forward as they get. It has a single main cpu, rom, ram, rs232 and some LEDs.
// State class - derives from driver_device
class sbc8008_state : public driver_device
{
public:
    sbc8008_state(const machine_config &mconfig, device_type type, const char *tag)
        : driver_device(mconfig, type, tag)
          , m_maincpu(*this, "maincpu")
          , m_ram(*this, "ram")
          , m_rom(*this, "rom")
          , m_rom_bank(*this, "bank")
          , m_rs232(*this, "rs232")
          , m_leds(*this, "led%u", 0U)
          , m_run_led(*this, "run_led")
          , m_txd_led(*this, "txd_led")
          , m_rxd_led(*this, "rxd_led")
{ }
Next, the methods are defined for memory and I/O access along with the bitbanged I/O and port handling. Additionally, required device fields are defined along with the output_finders. Output finders are used to bind UI items defined in the layout file.
    // This function sets up the machine configuration
    void sbc8008(machine_config &config);

protected:
    // address maps for program memory and io memory
    void sbc8008_mem(address_map &map);
    void sbc8008_io(address_map &map);

    required_device<cpu_device> m_maincpu;
    required_device<ram_device> m_ram;
    required_memory_region m_rom;
    required_memory_bank m_rom_bank;
    required_device<rs232_port_device> m_rs232;
    output_finder<8> m_leds;
    output_finder<> m_run_led;
    output_finder<> m_txd_led;
    output_finder<> m_rxd_led;

    uint8_t bitbang_read();
    void bitbang_write(uint8_t data);
    uint8_t port_1_read();
    void port_9_write(uint8_t data);
    void port_10_write(uint8_t data);

    virtual void machine_start() override;

    bool start = true;

    uint8_t memory_read(offs_t offset);
    void memory_write(offs_t offset, uint8_t data);

};
On machine start we bind the leds and setup the memory map and memory bank.
void sbc8008_state::machine_start()
{
    save_item(NAME(start));

    m_leds.resolve();
    m_run_led.resolve();
    m_txd_led.resolve();
    m_rxd_led.resolve();

    m_run_led = 1;

    m_rom_bank->configure_entry(0, m_rom->base() + 0x2000);
    m_rom_bank->configure_entry(1, m_rom->base() + 0x4000);

    m_rom_bank->set_entry(0);

}
Since the memory layout is different on startup, we need to handle that case and read from ROM. Once the bootstrap process is complete, this reads from RAM.
uint8_t sbc8008_state::memory_read(offs_t offset)
{
    if (start)
    {
        return ((uint8_t*)m_rom_bank->base())[offset];
    }
    else if (0 <= offset && offset < m_ram->size())
    {
        return m_ram->pointer()[offset];
    }
    else
    {
        logerror("%s:ld invalid mode read ($%02X) start %d size %d\n",
            machine().describe_context(), offset, start, m_ram->size());
        return 0xff;
    }
}
This method performs writes to RAM.
void sbc8008_state::memory_write(offs_t offset, uint8_t data)
{
    if (0 <= offset && offset < m_ram->size())
    {
         m_ram->pointer()[offset] = data;
    }
}
On bitbang read, get the results from the terminal and set the LED.
uint8_t sbc8008_state::bitbang_read()
{
    uint8_t result = m_rs232->rxd_r();
    m_rxd_led = BIT(result, 0);
    return result;
}
On bitbang write, send data to the terminal and set the LED.
void sbc8008_state::bitbang_write(uint8_t data)
{
    m_txd_led = BIT(data, 0);
    m_rs232->write_txd(BIT(data, 0));
}
A read from port 1 brings the machine out of startup.
uint8_t sbc8008_state::port_1_read()
{
    start = false;
    return (uint8_t)start; //Is this value used in the monitor?
}
A write to port 9 allows access to the Blinkenlights.
void sbc8008_state::port_9_write(uint8_t data)
{
    for(int i = 0; i < 8; i++)
    {
        m_leds[i] = BIT(data, 7-i);
    }
}
Writing to port 10 switches the ROM being used. For example, this is used to switch to Scelbal basic.
Comment from monitor.asm
;------------------------------------------------------------------------
; load code into RAM which, when executed, will set the bits of output port 10
; to control the A14 and A13 address lines of the EPROM. when executed, the code
; in RAM sets the address lines to select the second 8K of EPROM and then jumps
; to address 2000H which is the start of the SCELBAL BASIC interpreter.
;------------------------------------------------------------------------
void sbc8008_state::port_10_write(uint8_t data)
{
    if (data < 2)
    {
        m_rom_bank->set_entry(data);
    }
}
This methods sets up the memory map.
| Range | Memory |
|---|---|
| 0000-1FFF | RAM |
| 2000-3FFF | ROM |
void sbc8008_state::sbc8008_mem(address_map &map)
{
    map(0x0000, 0x1fff).ram().rw(FUNC(sbc8008_state::memory_read), FUNC(sbc8008_state::memory_write));
    map(0x2000, 0x3fff).bankr("bank");
}
This methods sets up the I/O Space for the Ports and Bitbanged I/O.
| Range | Device |
|---|---|
| 0000 | Bitbang Read |
| 0001 | Port 1 Read |
| 0008 | Bitbang Write |
| 0009 | Port 9 Write |
| 000A | Port 10 Write |
void sbc8008_state::sbc8008_io(address_map &map)
{
    map.global_mask(0xff);  // use 8-bit ports
    map.unmap_value_high(); // unmapped addresses return 0xff
    map(0x00, 0x00).r(FUNC(sbc8008_state::bitbang_read));
    map(0x01, 0x01).r(FUNC(sbc8008_state::port_1_read));
    map(0x08, 0x08).w(FUNC(sbc8008_state::bitbang_write));
    map(0x09, 0x09).w(FUNC(sbc8008_state::port_9_write));
    map(0x0A, 0x0A).w(FUNC(sbc8008_state::port_10_write));
}
This is the standard Macro for setting up the terminal. I copied pasted from somewhere else. I just needed to change the Baud Rate and set the TERM_CONF for auto line feed and carriage return.
static DEVICE_INPUT_DEFAULTS_START( terminal )
    DEVICE_INPUT_DEFAULTS( "RS232_RXBAUD", 0xff, RS232_BAUD_2400 )
    DEVICE_INPUT_DEFAULTS( "RS232_TXBAUD", 0xff, RS232_BAUD_2400 )
    DEVICE_INPUT_DEFAULTS( "RS232_DATABITS", 0xff, RS232_DATABITS_8 )
    DEVICE_INPUT_DEFAULTS( "RS232_PARITY", 0xff, RS232_PARITY_NONE )
    DEVICE_INPUT_DEFAULTS( "RS232_STOPBITS", 0xff, RS232_STOPBITS_1 )
    DEVICE_INPUT_DEFAULTS( "TERM_CONF", 0x080, 0x080 ) // Auto LF on CR
DEVICE_INPUT_DEFAULTS_END
This is the main entry point for the machine. Here we setup the clock, load address spaces, load the layout, setup the terminal and configure the ram.
void sbc8008_state::sbc8008(machine_config &config)
{
    I8008(config, m_maincpu, XTAL(1'000'000)/4);
    m_maincpu->set_addrmap(AS_PROGRAM, &sbc8008_state::sbc8008_mem);
    m_maincpu->set_addrmap(AS_IO, &sbc8008_state::sbc8008_io);

    config.set_default_layout(layout_sbc8008);

    // To provide a console, configure a "default terminal" to connect to the serial port
    RS232_PORT(config, m_rs232, default_rs232_devices, "terminal");
    // must be below the DEVICE_INPUT_DEFAULTS_START block
    m_rs232->set_option_device_input_defaults("terminal", DEVICE_INPUT_DEFAULTS_NAME(terminal));

    RAM(config, m_ram).set_default_size("8K");
}
For the rom images we load those to into the defined banks and make sure the checksums and hashes match.
ROM_START(sbc8008)
    //For the addresses to makes since, setup a huge rom chip and load the roms to the cooresponding machine addresses
    ROM_REGION(0x10000, "rom",0)
    //         Name                   offset  Length   hash
    ROM_LOAD("monitor.bin",          0x2000, 0x2000, CRC(0f3aa663) SHA1(27679a370b45050b504a2c8f640d20e39afd78d6))
    ROM_LOAD("scelbal-in-eprom.bin", 0x4000, 0x2000, CRC(3d25b65a) SHA1(e1db1ba610ed0103d142f889a1995a5d95883c79))
ROM_END
Demo
8008-Super
All this will make more sense if you read Dr. Baker's write up first.
After I gained confidence writing 8008-SBC, I started reading bus code for other systems. Mame is doing a lot of stuff under the hood to get menus populated and command line parameters working. Adding the bus and cards seemed like a black art at times but I eventually got something running.
Master

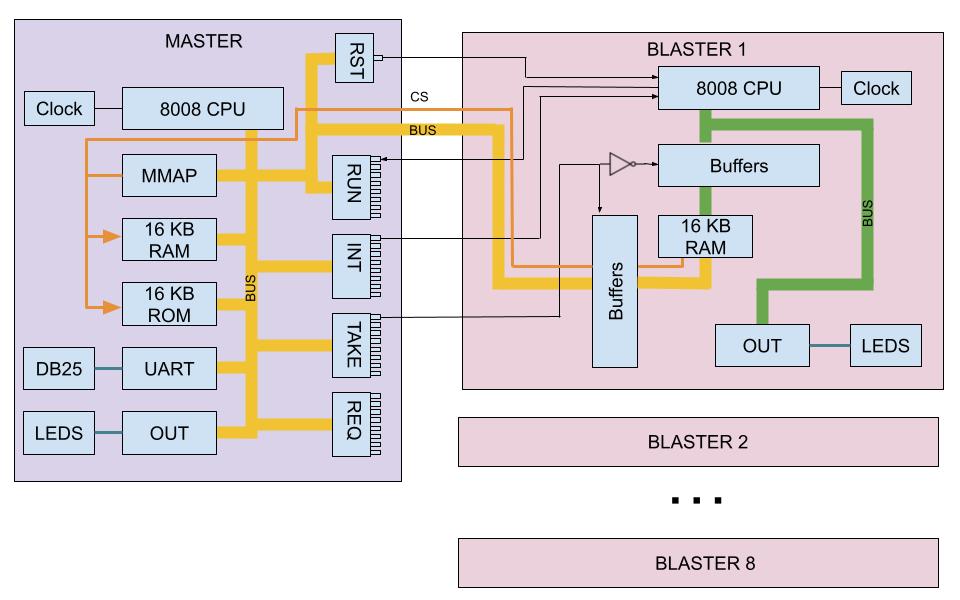
I'll go through the block diagram for the system and explain which parts of the Mame emulator are doing what.
Memory Mapper
A 74670 4x4 register file is used for the memory mapper. When not in start mode, address lines A12 and A13 are used to reference which of the 4 registers contains the A12 and A13 lines of the ram or rom. The ram and rom cs are the high bit and bit 3 is if we are issuing an external chip select.
I didn't see a 74670 listed in the mame source code so I created a struct, member variable and supporting functions to simulate it.
uint8_t mmap[4] = {0}; //used to simulate the 74670 4x4 memory mapper
struct memory_map_info
{
    uint8_t mmap_index;
    uint8_t mmap_value;
    uint8_t ra12;
    uint8_t ra13;
    uint8_t ext_cs;
    uint8_t rom_cs;
    uint16_t address;
};
When and I/O request comes in on 0x0C to 0x0f the struct is populated.
map(0x0C, 0x0F).w(FUNC(super8008_state::memory_mapper_w));
In memory_mapper_w the offset will start at 0b1100 and to go 0b1111. Only the two bottom bits are needed and the rest are removed using the mask.
void super8008_state::memory_mapper_w(offs_t offset, uint8_t data)
{
    uint8_t index = offset & MMAP_MASK;
    mmap[index] = data & 0xff;
}
When the system is reading and writing ram it needs information from the memory mapper. This function populates a struct based on which mapper is being accessed.
memory_map_info super8008_state::get_mmap_info(offs_t offset)
{
    memory_map_info mmap_info;

    mmap_info.mmap_index = (BIT(offset, 13) << 1) | BIT(offset, 12);
    mmap_info.mmap_value = mmap[mmap_info.mmap_index & MMAP_MASK];
    mmap_info.ra12   = BIT(mmap_info.mmap_value, 0);
    mmap_info.ra13   = BIT(mmap_info.mmap_value, 1);
    mmap_info.ext_cs = BIT(mmap_info.mmap_value, 2);
    mmap_info.rom_cs = BIT(mmap_info.mmap_value, 3);
    mmap_info.address= (offset & 0x0FFF) | ((mmap_info.ra13 << 13) | (mmap_info.ra12 << 12));

    m_bus->ext_cs(mmap_info.ext_cs);

    return mmap_info;
}
Bus
Similar to the actual backplane that is part of the Master PCB, Mame also has a backplane or Bus that is used to add additional cards. It took me awhile to figure out how to implement a bus in Mame. They have some good examples from the 8-bit era such as the PET and Kim1 that I used for reference. The bus provides the bus_device that the blasters will inherit. These methods align with the block diagram from above.
virtual void ext_write( offs_t offset, uint8_t data) override;
virtual uint8_t ext_read(offs_t offset) override;
virtual void ext_int() override;
virtual void ext_reset() override;
virtual void ext_req() override;
virtual void ext_take(int state) override;
virtual uint8_t ext_run() override;
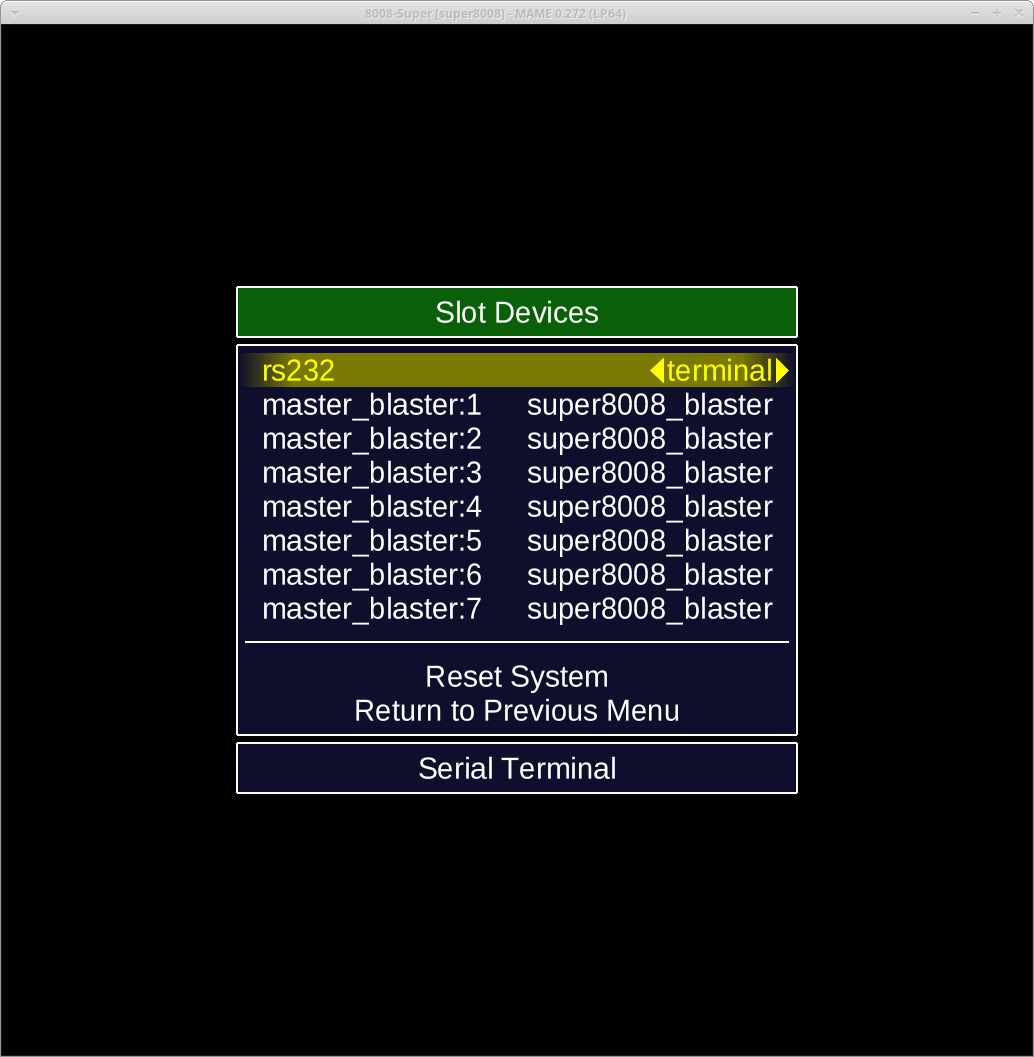
Once the bus is built in Mame, cards can be easily added using some macros.
SUPER8008_BUS(config, m_bus, 153600);

SUPER8008_SLOT(config, m_slots[0], super8008_bus_devices, "super8008_blaster");
SUPER8008_SLOT(config, m_slots[1], super8008_bus_devices, "super8008_blaster");
SUPER8008_SLOT(config, m_slots[2], super8008_bus_devices, "super8008_blaster");
SUPER8008_SLOT(config, m_slots[3], super8008_bus_devices, "super8008_blaster");
SUPER8008_SLOT(config, m_slots[4], super8008_bus_devices, "super8008_blaster");
SUPER8008_SLOT(config, m_slots[5], super8008_bus_devices, "super8008_blaster");
SUPER8008_SLOT(config, m_slots[6], super8008_bus_devices, "super8008_blaster");

m_slots[0]->set_option_device_input_defaults("super8008_blaster", DEVICE_INPUT_DEFAULTS_NAME(blaster_input_0));
m_slots[1]->set_option_device_input_defaults("super8008_blaster", DEVICE_INPUT_DEFAULTS_NAME(blaster_input_1));
m_slots[2]->set_option_device_input_defaults("super8008_blaster", DEVICE_INPUT_DEFAULTS_NAME(blaster_input_2));
m_slots[3]->set_option_device_input_defaults("super8008_blaster", DEVICE_INPUT_DEFAULTS_NAME(blaster_input_3));
m_slots[4]->set_option_device_input_defaults("super8008_blaster", DEVICE_INPUT_DEFAULTS_NAME(blaster_input_4));
m_slots[5]->set_option_device_input_defaults("super8008_blaster", DEVICE_INPUT_DEFAULTS_NAME(blaster_input_5));
m_slots[6]->set_option_device_input_defaults("super8008_blaster", DEVICE_INPUT_DEFAULTS_NAME(blaster_input_6));
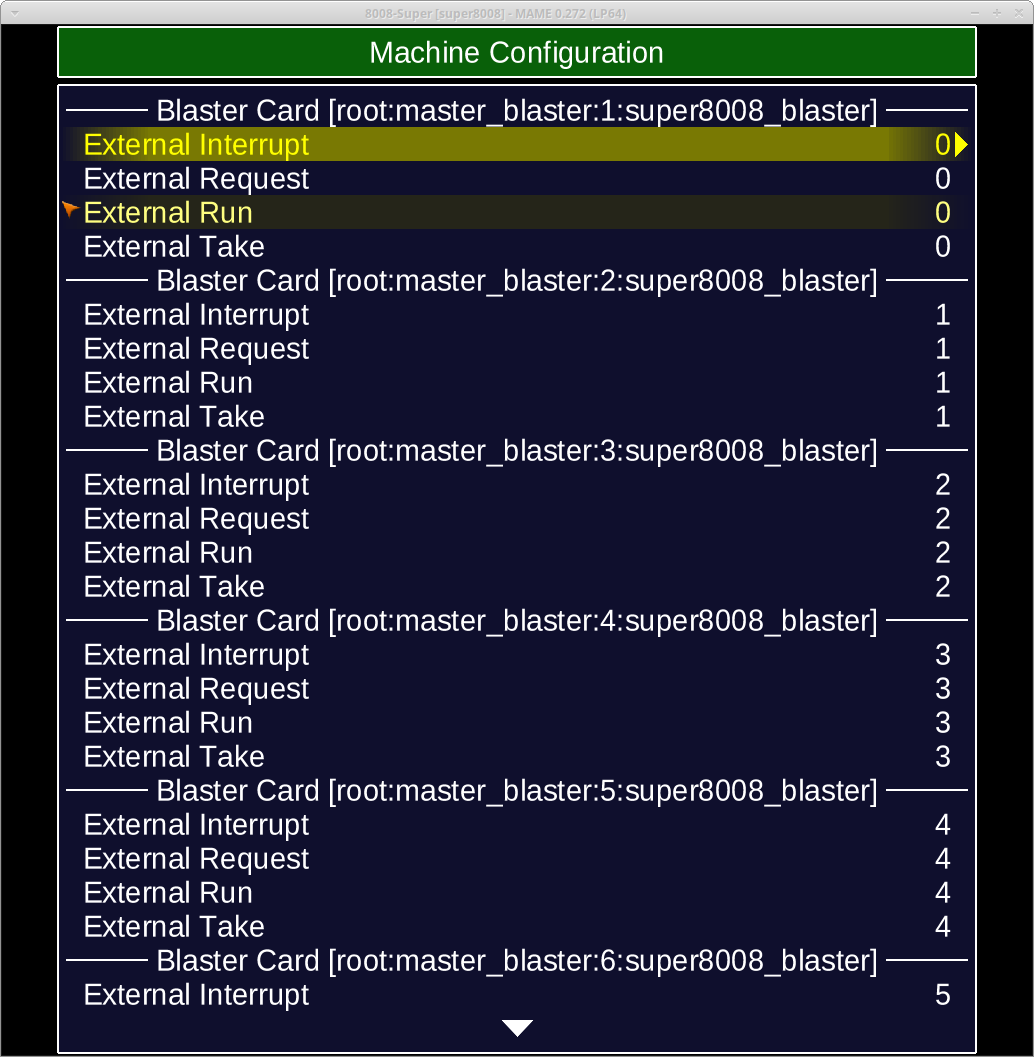
The bus and card configuration can be viewed from the Mame configuration screen. Since the hardware doesn't currently have different cards and bus configurations, the correct slots and jumpers are set from Master.

Blaster
8008 change
The 8008 has three pins S0, S1 and S2 that were used to get the different CPU states. In the blaster pld, this state is the "running" output pin which goes to the set of ext_run jumpers and then on to the bus. This is the code from the PLD that sets output pin:
stopped = !S2 & S1 & S0; /* halt instruction received by CPU*/`
The Mame 8008 emulator had an internal m_halt state but this was not tied to a state that could be checked. I added I8008_STOPPED so the state could be checked by the running code. Here is how the Conway assembly code is using that state to avoid contention.
mas_conway_wait:
    in MAS_STAT_PORT
    ani 01H
    jz mas_conway_wait
    ret
Jumpers
Since all of the Blaster cards have identical hardware, a jumper is needed to identify if the blaster is blaster 0 through blaster 7. This is emulated in Mame by setting device inputs for each of the cards.
#define SUPER8008_SETUP_BLASTER_JUMPERS(_num) \
    DEVICE_INPUT_DEFAULTS_START(blaster_input_ ##_num) \
        DEVICE_INPUT_DEFAULTS("EXT_TAKE", 0xff, _num) \
        DEVICE_INPUT_DEFAULTS("EXT_RUN" , 0xff, _num) \
        DEVICE_INPUT_DEFAULTS("EXT_REQ" , 0xff, _num) \
        DEVICE_INPUT_DEFAULTS("EXT_INT" , 0xff, _num) \
    DEVICE_INPUT_DEFAULTS_END

SUPER8008_SETUP_BLASTER_JUMPERS(0)
SUPER8008_SETUP_BLASTER_JUMPERS(1)
SUPER8008_SETUP_BLASTER_JUMPERS(2)
SUPER8008_SETUP_BLASTER_JUMPERS(3)
SUPER8008_SETUP_BLASTER_JUMPERS(4)
SUPER8008_SETUP_BLASTER_JUMPERS(5)
SUPER8008_SETUP_BLASTER_JUMPERS(6)

Demo
This demo follows the steps in Dr. Baker's original demo. Watch that one first.
The infinite Mame run requires ANSI Control sequences to refresh the screen and add the frame counter to the top right. The builtin Mame terminal doesn't support these control sequences but some blackmagic in linux can get the simulator working through minicom.
First socat is used to map Mame bitbang tcp/ip port to a TTY at 9600 Baud. I store those in my home directory so you may need to create $HOME/dev or change the command.
socat pty,link=$HOME/dev/ttyV0,b9600,waitslave tcp:localhost:6666
Next, run Mame with a null modem and bit banged I/O. If the mame command is being used instead of a debug build of super8008, replace super8008d super8008 with mame super8008 -rs232 ....
sudo ./super8008d super8008 -rs232 null_modem -bitb socket.localhost:6666
Start minicom
minicom -b 9600 -o -D $HOME/dev/ttyV0
SyncTERM
On Windows, SyncTERM can be used to connect to Mame without needing to setup a COM port to TCP/IP port mapping. It looks like it supports file transfers too.